I pulled off some photos from my Nexus One phone yesterday in order to clean them up, back them up, and then share them with some friends and family. I could view all of them easily with Windows Explorer. I loaded up Picasa 3 (a version earlier than 3.8.0 (build 115.53, 0)… sorry, I don’t know which earlier version) and proceeded to give several photos captions, straighten a few of them out and upload several batches to my online photo album.
One particular photo I was interested in sharing with my dad was the last one I gave a caption to before uploading the photos. I did not touch this particular photo in any way except to give it a caption, though this caption was special in that it was the only one of the lot to have a “=)” at the end of it. Once all the photos were finished uploading, I opened up my Gmail account in Firefox and proceed to draft up an email with the text and then go visit my online photo album page so I can copy the link to share with my parents. That’s when I notice this one particular photo was not online. Perplexed, I check back in Picasa and see the library thumbnail of the photo and I double click it to view it. That’s when the damage became readily apparent. The thumbnail was intact, but if I tried to view the photo itself, nothing but gray showed in Picasa. I edited the caption and deleted the “=)” at the end thinking that captions somehow hate emoticons, but to no avail, the photo was damaged and would not show anymore. I checked Windows Explorer and it wouldn’t even load the thumbnail. No other image viewer would open that file, all of them claiming it was damaged or corrupt.
So what happened to the file? Let’s investigate! I have made the original damaged file along with the fixed one (using a slightly different value at address 0x04, but one that works nonetheless) available here so that you may follow along with the post if you wish.
I opened up a copy of the corrupted image file with a hex editor and started pouring over the Exif and Jpeg file format information and decoding the file by hand to see where it broke down.
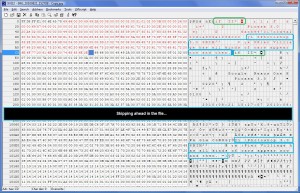
In the above image, you can see the hex notation for each byte as well as the text equivalent over on the right side. The left edge displays the position in the file for each 32 byte row as hex notation. Starting at address 0x100CE and continuing for the next 90 bytes (circled in blue) is where the “caption” for the image should be stored. Note that in this section you can see my original “=)” at the end of the comment. My edited comment has been saved starting at byte position 0x72 and continues for 88 bytes (also circled in blue). The red colored bytes are the “garbage that was added” to the beginning of the file. You can clearly see that bytes 0x08 – 0x10 (circled in green) are repeated down at 0xCE – 0xD6 (also circled in green). I guess that whatever code is causing this error is inserting a block of data in the wrong spot in the file. Everything colored in red was removed from the fixed file. Unfortunately, we’re not done yet.
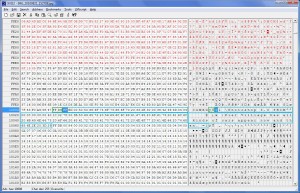
Once the extra garbage was removed from the beginning of the file, the image still wouldn’t load. Further investigation into the cause revealed the answer. Starting from address 0x04, the maximum size of any one section of Exif information is 0xFEFF. Why that number? First, we only have 2 bytes to store the size, but the reason we must further restrict the size is because 0xFF has special meaning in Exif and Jpeg file formats. If we allow the size to grow to 0xFF00 – 0xFFFF, the image will still be considered corrupted as image parsers out there will stop on the leading 0xFF and consider it a special marker. Let us see what a size of 0xFEFF will give us by changing byte 0x04 to 0xFE and byte 0x05 to 0xFF. After I mark all data from byte 0x04 for the next 0xFEFF bytes, you can see that the red colored bytes stop well before it gets to the caption information (circled in blue) starting at address 0x10008.
In order to fix this image, we need to shrink the header so that the “end of thumbnail” marker 0xFFD9 resides at address 0xFF01 instead of its current location of 0x10006 (the marker is circled in green). By deleting bytes starting from 0xFF01 up to and including 0x10005, we can safely chop a bit of the thumbnail off so that 0xFFD9 resides at address 0xFF01. Saving the file will now result in a fixed image file that can be viewed with any image viewer application, including Picasa, and the only loss incurred is a few pixels at the end of the thumbnail.
I am hoping that with this post, others may recover damaged images they may have and, more important, that Google engineers are able to track down this bug and fix it as soon as possible… if they haven’t already done so with their latest version. Due to the nature of this beast only striking now and then, I cannot reliably test to see if this bug is fixed or not. Unfortunately, I did not back up my original before trying to give it a caption inside Picasa. I usually wait until after I am done with captions before performing a backup since putting caption information is something I considered “safe”. Unfortunately, I think Picasa is generating a thumbnail for the image as well and it can sometimes make one that is too big to fit inside the file, thus corrupting it somehow. I hate to point the finger at anyone without hard proof, but considering the nature of the damage and the only tool used on this photo apart from Windows Explorer was Picasa, it is hard not to draw the conclusion that Picasa is at fault here.


This happened to me yesterday (with Picasa 3 on Windows 7 x64) and I started going through the annoying process of restoring from backups. Lo and behold, when I deleted the original folders to replace them with the backups, they came back to life in the recycle bin and I was able to restore them. Not sure what went wrong but I just threw the whole folder away, fetched it out of the trash, and voila, good as new.
Somehow last week picasa changed some photos (about 60) into corrupt bad jpgs after adding a nametag to it.
Sadly my backup was synced before I noticed the changes. Some jpg I was able to recover but most were lost.
I tried the trashvan trick but doesn;t work for me though, See my dropbox for the examples a few photos could be rescued.
https://www.dropbox.com/sh/vtwlenzri798qk8/4ufGUVq2Py
It must be possible to analyze the differences between the files like you discribed above to see what went wrong in order to recover the other jpgs
I hope you maybe have a solution to bring back the photo’s
Sorry, I do not have an automated solution at this time, nor even a link to one. =/